DreamTalk AI is an online generator that generates talking avatars from normal photos. DreamTalk also able to generate AI talking headshots.
Generating talking headshots can prove to be very helpful considering the area of your work. Let us dig deeper about DreamTalk AI and learn more about it.
What is DreamTalk AI?
DreamTalk AI is a diffusion-based framework. It generates expressive talking head videos. It offers many audio files and styles as well as pre-designed facial characters for users to get started with.
This AI tool has a network which denoises the project, a lip expert that is aware of styles, an extra style predictor which is diffusion-based, and more to ensure the best talking head creation.

How to use Dreamtalk using Huggingface?
After understanding what DreamTalk AI is, now it is finally time to understand the process of creating a talking head by following these simple steps:
Step 1: To access DreamTalk AI, you are required to use Huggingface by clicking here. This will direct you to the creation studio.

Step 2: Now, you are supposed to select an avatar from the set of examples or upload your own.

Step 3: Next, you are supposed to add the audio file that your generated character is supposed to speak. You can also select an audio from the set of collection present.
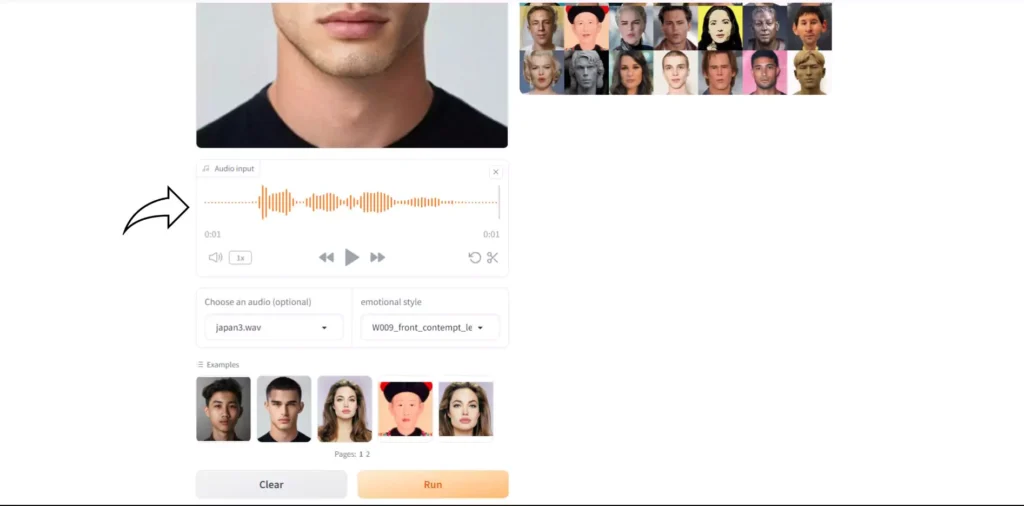
Step 4: Choose the emotional style for the detailed delivery of the speech by the avatar.

Step 5: Click on the Run button to finalize the talking head.

Step 6: Your video has been generated. You can either share or download it.

How to install DreamTalk in local?
Step 1: Download DreamTalk from GitHub
To install DreamTalk on your computer:
- Click on GitHub page link in my description to go to main page of DreamTalk.
- After page load, click on Code and download main zip file on your computer.
After Download:
- Extract it where you want to install it.
Step 2: Open Anaconda and Navigate to the Folder
After extracting:
- Run Anaconda as administrator.
- Go to the extracted folder inside Anaconda with CD command.
Step 3: Create the Python Environment
- Go to main page and you can copy code to create environment using Python 3.7 from there.
- Paste it in Anaconda.
Step 4: Activate the Environment
- After creating environment, copy activation code from main page and paste in Anaconda.
Step 5: Install Requirements
- After activating, run requirements code — you can copy it from main page.
Step 6: Install CUDA or CPU Version of PyTorch
- After installing requirements, copy CUDA code to install CUDA.
- If you don’t got GPU, go to PyTorch website and copy code for CPU.
- Paste in Anaconda. This will take some time to load.
Step 7: Install FFmpeg
- After installing CUDA, run ffmpeg command to install FFmpeg.
Step 8: Install Remaining Modules
- After installing FFmpeg, from main page copy and paste other three modules in Anaconda to install.
Step 9: Download and Add the Checkpoint
- After installing all the modules:
- You need to download checkpoint from link in my description.
- Paste it inside main folder.
Step 10: Install SoundFile Module
- You also need to install sound file before running main code.
Step 11: Prepare to Run the Main Code
After everything installed:
- Ready to run main code.
Important:
- You need to replace audio path with your audio file in main command.
- And picture path with your picture you want to use in main code.
You can copy code in one line from my description to make it easy.
Step 12: Organize Files Inside Folders
You can:
- Go to main folder
- Inside data folder, put:
- Audio file inside audio folder
- Picture file inside source image folder
Just replace names when changing files.
Step 13: Run the Main Command
After everything done:
- Run main command.
Using it first time will download some files and take few minutes — even with CPU.
Dreamtalk Features:
There are various features that DreamTalk offers for its users. Let’s discuss them below:
1. Make Photo Talk:
This is probably the best feature of this AI tool. It lets your video talk whatever you want it to talk about. Plus, you can even change the voice or style to have some fun.
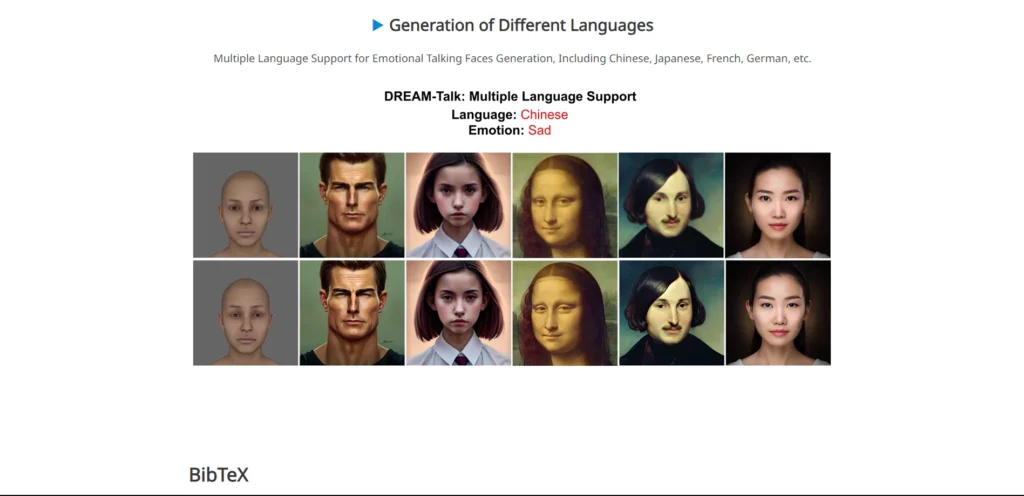
2. Generation of Different Languages:
With the help of this feature, you can change the language of the speech of your talking avatar. You can change the actual language to the language you want (provided it is available)
3. Qualitative Comparisons with other tools:
You get to compare the generated video with other tools to check how the generated video differs and check its quality.
4. Multiple Emotions:
There are various emotions available that you can associate your character with. For instance, happy, surprise, and anger are some of the emotions you can use.
5. Qualitative Comparisons with EVP:
This feature allows the user to compete the generated video with the automatically generated EVP and compare the differences between the two.
6. More Characters:
This feature demonstrates how the emotion you have chosen looks on other characters. This gives the user a proper understanding about using the selected emotion on its character.
7. A Conversation Across Time and Space:
Two portraits can be used together with independent emotions. It can be used to create fictional historical crossovers for fun.
Use Cases:
If you are wondering where you will use the generated talking heads, here are some examples to help you out:
Education: You can make a historical figure explain something crucial to help your students understand something much properly.
YouTube: You can use talking heads in intro of your videos to interact better with your viewers. This will make your video more engaging for the users.
Business: With the help of talking heads, you can easily explain your products to clients and come to the best deal.
Digital Assistant: A talking head can give detailed tutorials to users. This will help them understand everything properly.
FAQs:
Is DreamTalk free to use?
Yes! DreamTalk AI is absolutely free to use. You can easily create a talking head without having to pay any plans and easily download or share the generated video.
Does DreamTalk AI also generate full body avatars or only talking heads?
DreamTalk AI only allow its users to generate talking heads and not talking full bodies. It does not support full body generations.
Can DreamTalk AI detect my face from my full photo?
No! DreamTalk AI will not be able to detect your face from the full photo.
Can I change emotions of the characters after they have been generated?
No, you can only select the motion for your character before the final video has been generated.
Can I trim some portion of my audio file?
Yes! You get an option in the audio input section that allows you to trim the audio file and remove the unwanted part of the file that you do not want your character to speak.
Conclusion:
Considering there are no priced plans to access DreamTalk AI is one of the perks of using this generator. The steps are simple and easy to understand for users to generate the best talking heads. The talking heads are perfectly crafted with no time lag between lip-sync and audio. Plus, the audio generated is also clear. The video is created perfectly with proper motions and speech.